|
| 15" x 17" |
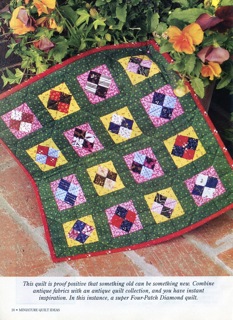
Here's my latest 'small' quilt; the first in a series.
You may remember that February is my month to play with fabrics and styles typical of many early Pennsylvania 'Dutch' quilts...nothing whatsoever to do with Holland - but rather a simplification over the years of 'Deutsch' or German. Examples date predominantly from the mid 1800's into the early part of the twentieth century and are characterized by the use of bright colors (red, green, yellow, orange etc) and the absence or minimal use of white, tan and other more commonly used neutrals. Light blue, yellow, red, 'cheddar' - all may be used as backgrounds giving these quilts what some consider a gaudy appearance. The late great Cinda Cawley once said that in Pennsylvania orange IS a neutral!

I combined features of two quilts in Great Little Quilts by Eleanor Levie. If you have the book take a look at pp. 97-99. If you don't and you love small quilts I saw several copies on
Amazon.com at ridiculous prices. In it are 45 antique crib and doll quilts with directions. I don't know the author and have no affiliation. Nor do I necessarily follow the directions! I like the now-you-see-it-now-you-don't look of both Broken Dishes and Pinwheel blocks.

I used both the front and back of the green print when I discovered the back was lighter and a bit more lime-y.
I used a few different pinks as well.
These little things are so much fun to put together I think it could become addictive! I've decided to call them 'smalls' rather than doll quilts as there are so many ways they can be used.
A few vintage examples

I saw this small quilt at one of the AQSG seminar vendors in Ohio in 2006. Perhaps one of you owns it now!
The design looks complex but is just simple Sawtooth Stars set diagonally. The maker alternated the color placement of the pieced star and the background. You'll notice she didn't get it exactly right when putting it together....but isn't that the kind of thing that makes us study it a bit longer? And smile?
The borders and the little appliqued leaves floating around the edges and those tiny hearts in two corners add a nice touch.
 |
| Close-up of above example |
 |
| Pillowcase |
 |
IQSC Collection
15" x 15" |
Ann Hermes has a great collection of vintage Pennsylvania textiles.
Here are two pillowcases she shared at the AQSG seminar in New Jersey last year.
In case you find yourself wanting to whip up a little quilt like mine - in your own color choices.....here's how I did my triangle units.
Tutorial - Easy Triangle Units
1. Cut two squares about 1" larger than you want the finished unit. Specific math directions say 7/8" but I find they can get kind of out of shape - you may not sew a scant enough seam or whatever..... so I like to just add an inch and it keeps the math simple, too.

2. Draw a pencil line diagonally across the back of the lighter one.
3. Place them right sides together, pin and sew a scant 1/4" on each side of that drawn line.


4. Cut on the pencil line
You now have two identical units.
Because I added a bit more than technically needed when I cut the initial square, I now need to trim them to the precise size I want. In this case just a sliver - less than 1/8" - came off most of them...
Be sure you line up
three things when trimming.
1.That yellow 90 degree line on your ruler must be exactly along the diagonal seam. Being right handed, I line up the bottom left corner.Now position it so that both the
2.left side and the
3. bottom side read the same - 2 1/4" in this case.
Then you trim only two edges; the right and the top.
Thanks for Visiting!
Oh. I almost forgot....
Amish Quilts and the Welsh Connection arrived today!