Sunday, August 16, 2015

Butterflies- Signs of Hope

18" x 22"
I needed another project like a hole in the head when I spied this sweet little thing in Lori Smith's booth at the Minnesota Quilt Show a year ago.
It's hand appliqued, embroidered and quilted.
Both vintage and 1930's reproduction fabrics are used. The lavender sashing is also vintage.


That's the good news.

I started doing some larger butterfly blocks years ago. (Are you noticing anything here? I have many projects that span many years!)
At the time, I wanted to learn how to do needle-turn applique. I found two butterfly designs I liked and did some of each in vintage fabric; some feedsack - some not. Here are a few lying side by side on the floor,


The typical way of finishing these popular quilts in the 30's and 40's was with a black buttonhole stitch embroidered around them, That's when I  realized that  my invisible applique would not show at all!

I did improve my 'needle-turn" skills, though.


As a quilt appraiser for over ten years, I saw a few different methods used to embellish applique motifs with embroidery. Sometimes a simple running stitch by hand or machine was used to secure the motif before embroidery. I didn't find that it detracted from the piece. You had to look very closely to even see it. Was it a time saver? I'm not so sure. Maybe getting that little edge turned under to nail it down by machine would take a bit of time.
Some were finished 'raw edge'. Quick and easy but embroidery thread is not terribly strong. Over time, with wear and washing, it would start to come loose leaving the applique 'unattached' and the quilt unattractive and fragile. Done for, in other words, unless someone wanted to do a lot of repair work.

For the raw edge method to work well, one would have to place those buttonhole stitches very close together as was done in the Broderie Perse examples on early cut-out chintz motifs. Even then, as you can see in this vintage example of closely spaced embroidery, there is the risk of the motif coming loose over time. This maker used a 'chain' stitch around each motif.


So I am glad I appliqued mine by hand. I did get more skilled in that method and one hundred years from now those butterflies should still be secure!

Butterflies appeared on many quilts during the Depression years. They signify hope -  much needed during that time. In spite of, or perhaps because of, the bleak circumstances of the time women made a tremendous effort to provide a cheerful home. Many quilts of the era are pastel, cheerful looking things to lift the spirits.

Here's an exceptional example from the collection of the International Quilt Study Center and Museum dated c. 1920-1940.

WOW!

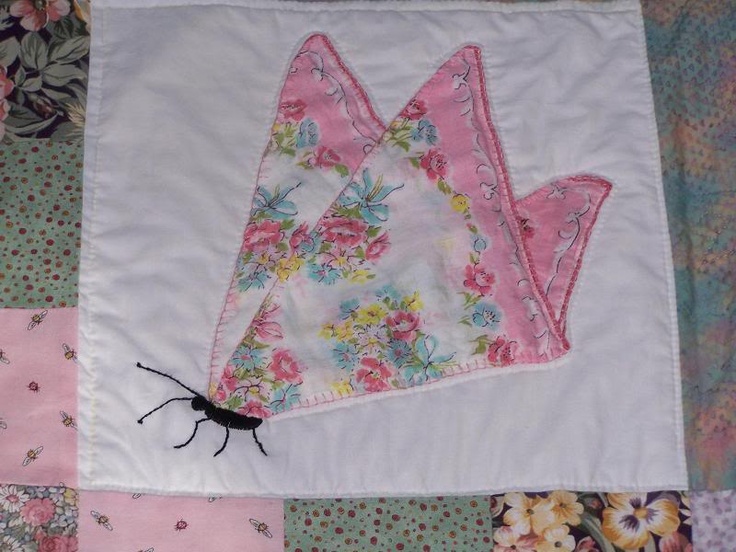
I was amazed upon searching Pinterest and other sources to find a tremendous variety of styles from simple to complex; pieced, appliqued and even this one - made with a vintage handkerchief.


 Simple Applique


Simple  Pieced


Complex Pieced


 Paper- Pieced


 All Hexagons!


I have a total of 20 blocks done at this time. My records show that I started them, OMG, the summer of '97. ( I have no shame. I hope my sharing makes you feel better about some of your UFO's!)
Sometimes delays result in a chance to revise the original plan. I suppose I was aiming for a bed quilt but now I think I will work up setting that requires exactly 20 blocks and call it a day.

 It's time, don't you think?


Have you made a butterfly quilt? Do you own a vintage example?
.

Monday, August 3, 2015

Mariner's Compass - DONE!

Drum Roll, please!
 This is it! The 5th and last entry on this 'long-term' project, first shared with you in 2011. I've put links below if you want the full background before reading the finale!


You may recall that I purchased the packet of reproduction fabrics, c. 1840, in 2007. They sat in lovely stacks for a few years before being put to use!

I made a concerted effort to stick with the hand quilting over the winter and that made a big difference. I set a goal to have it done this year; to use it on my bed this fall.  Or else!

I had decided early on that I would put my name on the front of the quilt. The two outermost bottom corner 6" blocks are plain with that in mind.
Deciding how I wanted to do that took some time but I'm happy that I didn't rush it. I wanted it to be just the right thing.

I knew I wanted to repeat the circle of the central Mariner's Compass and small blue circles in the corners of the checkerboard, seen in the view above.


                       I found this design in Antique Quilting Designs by Roberta Benvin.


It was used as the center quilting motif in a feathered wreath on the plain setting blocks of a c. 1840 Double Nine Patch quilt; a circle and the required four places defined to embroider my information. 
 That fit well with the date of the reproduction fabric I used as well as the frame style layout.

Bingo!


I enlarged the design and slipped it under the corner over a light box to trace.


.
I combined embroidery with complimentary quilting.  I used double strand blue thread for the chain-stitched circle and to outline leaf shapes.

 The data itself required using a single thread.


The label on the back contains a few more details but the basics are on the front for all to see. I don't want someone have to 'discover' it by accident in 100 years....or  worse yet, NOT discover it!

At last I was ready for the  final step. Binding.

I had run out of the mottled neutral background which probably would have been my choice if I'd had enough so I'd been carrying around a piece to get a good coordinating tone. I wanted the binding to be understated letting the sharp triangle 'pennants' stand out.

I found a large print that had the right 'tone' and I thought it would work when folded 'skinny' and be interesting. I made yards and yards of it, starting sewing it on and didn't like it.


 Rip. Rip. Rip.


I didn't want to get stuck this close to the end! Luckily, a fabric that came with the original fabric line worked and I had enough of it.


The last few stitches - Had to record them!


TA -DA!


Facts:

Size:86" W x 94" L
Hours to hand quilt: 140
Batt: wool
Original Design


I hope you are all well and enjoying your quilting adventures. I have been AWOL from writing this blog for some time and hope to be much more regular now. I have acquired quite a few new 'old' quilts I'd like to share with you and have finished lots of smaller projects, too.


 Please check back and send your comments to keep me honest.


.