Thursday, December 31, 2015

2016 Fast Approaching

SCREECH. . . .

I finished this wall quilt just in time to hang it in my kitchen for Christmas - and to count as DONE in 2015! Having seen my recent posts on Lone Star quilts you will recognize it as one of several experiments in that design which got left in various states of completion over ten years ago.
I machine quilted the diamonds wanting to save time but then got a bit carried away with the hand quilted wreaths in the corners and setting triangles.


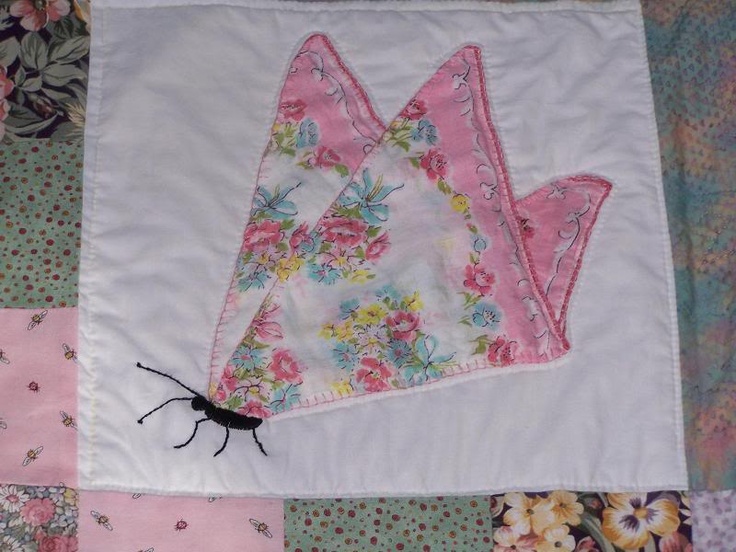
I questioned my sanity at the time but I'm glad I did it now - I think hand quilting always adds a lot. It's hard to get a photo that shows the quilting but this gives you an idea. I have yet to immerse it in clear water to be sure the blue marker I used is gone forever and also to get the look I like...but I wanted to get it up without waiting for it to dry!


As you may know, I am a goal setter and record keeper so naturally I have spent some time reviewing and summarizing the past year. I finished 3 bed quilts ( the major one being the Mariner's Compass Medallion I've blogged about ),
2 crib quilts, 3 wall quilts, 2 doll quilts, several gift items;  pot holders, a pin cushion for an exchange, quilt tote bags as well as a bit of regular sewing - a red fleece poncho for me - pattern and fabric from last year!


A first for me was teaching a hand quilting class which was really fun and I'll do it again next fall.

c. 1900
c. 1910
I attended numerous quilt events including driving to the AQSG seminar in Indianapolis in  September (bought two quilts on the way!) and a Regional Study group meeting in Phoenix, AZ.


I didn't think at first that I'd added more quilts to my vintage collection but, I was wrong. I purchased 7 new pieces.

Even though I sold and donated several items I still end up having more in my collection than last year at this time. I vow to down-size in 2016 by not buying any more and finding new homes for at least a few that I can part with.


So the next step, naturally, is  to think about what I want my quilting life in 2016 to be. In that vein, I challenged a couple of quilting friends to review the past year and come up with ONE WORD that will inform their quilting life in 2016. 

I've chosen mine and will meet with them tomorrow to hear what they've come up with. After that I'll share my choice with you and with any luck, my posts next year should reflect that word/concept at least once in a while. Keep me honest, won't you?

If YOU'D like to choose a quilting word for 2016 please share it in the  'Comments' section.
It would be fun to hear from you!


I wish you all a healthy and productive year doing the things you love.

Happy New Year!

Sunday, November 29, 2015

Christmas Stars - Considerations and Decisions


60" square
There is nothing like a public commitment, along with a challenge, to get me to buckle down and focus.
The Christmas Lone Star blocks I made in 2002 (as described in the previous post) have been rescued from the UFO tub and come together in a very festive Christmas quilt... (technically still a top which at this late date will be the case until Christmas 2016)
Still, I am so pleased to have made progress on this! It was a major goal of mine this year to deal with my UFO's.
After determining the math and cutting the squares and triangles to finish each block, I got quite adept at the somewhat tricky process. As I worked at my machine I thought about how I might arrange them. I spent evenings browsing books from my collection for ideas and looking on-line using Google Image and Instagram with 'lone star quilts' as key words.
Texas being the 'Lone Star State' I started with these books:

Then these:

and this one, To Honor and Comfort, which inspired my Southwest Star

After studying these books and internet photos I knew what I wanted to do.

What is your destiny?
I decided to use nine of the ten blocks set 3 by 3 resulting in a square quilt. Besides the challenge of setting ten blocks, I felt that this one was much bolder than the others and that it would distract from the balance of the piece. I'll make something else with it.... pillow? table topper? wall or doll quilt?
Truer colors of the red and green


Every project involves multiple decisions. My considerations in this case were these:
  • What size and shape did I want the finished piece? 
  • How did I want to use it? 
  • How much time did I want to invest in it?
    • complexity of setting
    • how it would be quilted 
Ultimately, I decided to set the blocks straight, three by three, within a narrow (1.5") sashing for these reasons.

  •  Setting them side by side results in big open squares that insists on some pretty special quilting in my opinion. You can't see how that space is quilted in this example but you do see the big open areas of background.
  •  My blocks are all different and I like the idea of each one getting some attention.
  •  The finished size would be about 60" square - fitting for my goals.
  •  Available fabric -I found some of the same red in the stars in my Christmas bin for the sashing. I used tidbits, also in that bin, of a large scale print that also appears in most blocks, for the cornerstones.
I used EQ to play with numbers and layouts; with and without cornerstones in different colors; tan, green, mottled. I liked the break those little squares provided. That helped me decide to cut the sashing 2" wide and let it serve as the outer border.
I used my design wall to arrange the blocks.The process of making all of these artistic decisions can be frustrating but it's energizing in the end. This is my work. Yes, it takes a sometimes more agonizing path than following a pattern but the satisfaction you get as you take each step is worth it.
There are so many ways to do things; no one way is right. Keep moving along. Try things, decide, move on. Sometimes you don't know why you like one thing or another but you don't need to. Stand back, squint, move things, try this and that ...and you will know what you like. Be okay with ripping if what you thought would work doesn't. Get it the way you want it.

Each 2" square can be different
For example, I cut the 2" squares for the cornerstones from a large print and just sewed them in.  I wanted a random look...not match-y. But I realized when they were sewn in that one was almost all dark green and it stood out. I had to decide to leave it or remove it ...maybe I should use a different dark green for all of them; think think think.But I wanted them to be less obtrusive. I removed two of them and this time was more careful to selectively cut lighter squares that would blend.

I decided to put squares at each outer corner, too, and for those I thought before I cut! I wanted the dark green dominant with a cluster of red included so my fabric looks like Swiss cheese now.I like the result.

So now on to a few other things.....

What is on your 'to-do' list for the holidays?

Wednesday, November 18, 2015

The Lonestar revisited

"Desert Star"   78" x 86"
Hand quilted
Years ago I went on a retreat where I learned how to make the classic Lonestar quilt. We visit Arizona each year so I chose a southwest theme.

Here's the finished queen sized quilt. The very simple graphic result does involve a bit more complex piecing; working with diamond shapes and then setting in the corner squares and side triangles.
I got very excited about working with this design...and I went a little crazy!


I wanted to try different sized diamonds and other color combinations. I worked up a class which I taught both in Minnesota and Arizona.
I made three samples for that class; 30 inches square. This one is currently being quilted - you can see my pins. I'll use it on a wall or as a table topper.
Sample 1
The rest are still tops waiting to learn their fate. The patriotic themes may serve as centers for a larger quilt.
Sample 2
Sample 3
This size was doable for the students in the number of sessions we had, allowing them to get to the 'setting-in' part with guidance. That seems to be where many quilters abandon the design.

Here is one such top in progress... probably made around 1900 by the look of the fabrics. This is a 6 pointed star (which you see less often than the 8 point) but the construction and the challenges are similar.

I show it lying on the carpet and then lying atop a piece of blue fabric as a possible idea for finishing it -- someday--maybe.


I made a mini with scraps from the big one.
10" x 13"
Then I took a few Christmas fabrics I had on hand for yet another size - and made up 10 blocks, each different due the placement of the fabrics. It was fun ...but the stars ended up in UFO tub.
That was 2002!
Fast forward to last month. A quilting friend asked us to bring something to the December meeting that was holiday themed - that was unfinished - and that we wanted to finish. She'd come across a pillow she'd started years ago and was determined to finish it.
The pile of pieced stars

Those star blocks had been on my 'to-do' list for years! Her challenge came at just the right time for me.
Out came the blocks.
Out came the folder from my class with the tips for cutting the setting squares and triangles.

A shopping trip resulted in a fabric I thought would be perfect for background.
A Kay England print
I got busy cutting out the needed corner squares and side triangles and setting them in. 


The finished blocks measure 18" square. Here are 4 of them.


 Today I'll finish the rest and begin deciding on how to set them. 
Shall I use all 10 or go with just 9 - an easy 3 by 3 setting?
Maybe a narrow sashing?
Or 'on-point'?


 Stay tuned!
I promise is won't be 13 years!


Tuesday, November 10, 2015

Facing Winter

My last post looks rather ridiculous now; butterflies in November! Winter is closing in on Minnesota but fall lingers a bit, a day here and a day there, and today was one of those 'fallish' days. Sunny, with a light breeze - we made it into the 60's.
I got up intending to do some machine quilting on a small quilt; finish it maybe. But suddenly I had the urge to take advantage of the nice day and wash a vintage quilt.

I bought this in Arizona a few years ago. The simple arrangement of nine- patch blocks grouped into a larger four-patch appeals to me. Was the wide double pink sashing with intersections of a 4 patch done to enlarge the quilt? Did she happen to have a nice chunk of that pink?

An assortment of fabrics from the early 1900's includes mourning prints, double pinks - lots of that in the wide sashing - several chambrays, stripes and indigo from light to dark. Notice the swastika print shirting.  This would indicate it being made before WWII when that symbol took on such negative connotations.

The sashing within the 4 patch is an unusual blue print that feels like a soft wool challis. The batting may be wool, too. It has that sort of 'slippery' feeling when you rub the layers together as opposed to cotton which just sticks...it doesn't move at all. There are no holes or openings so I can only guess about that but it I have 'sleep tested' this one and it feels like wool. Lightweight but instant warmth.


Hand quilted in an overall diagonal grid about 1"


It didn't seem particularly dirty but, after all, it's over 100 years old so why not freshen it up?
I used my top-loading machine leaving the lid up and doing the agitating with my own hands, gently. I laid it outside with large sheets under and over it.
(I took the sheet off for the photo!)


I enjoy close study of my old quilts. On this one did you notice in the full view that two sides have an extra strip of pink?

And especially intriguing is this blue square in one corner. Did she really run out of that pink? Or did she mark a corner so that she could more easily rotate the quilt for even wear?

The backing is plain cotton muslin

  It turned out beautifully! As always, the quilting design is enhanced and...
it smells like sunshine.


Sweet Dreams!


Sunday, August 16, 2015

Butterflies- Signs of Hope

18" x 22"
I needed another project like a hole in the head when I spied this sweet little thing in Lori Smith's booth at the Minnesota Quilt Show a year ago.
It's hand appliqued, embroidered and quilted.
Both vintage and 1930's reproduction fabrics are used. The lavender sashing is also vintage.


That's the good news.

I started doing some larger butterfly blocks years ago. (Are you noticing anything here? I have many projects that span many years!)
At the time, I wanted to learn how to do needle-turn applique. I found two butterfly designs I liked and did some of each in vintage fabric; some feedsack - some not. Here are a few lying side by side on the floor,


The typical way of finishing these popular quilts in the 30's and 40's was with a black buttonhole stitch embroidered around them, That's when I  realized that  my invisible applique would not show at all!

I did improve my 'needle-turn" skills, though.


As a quilt appraiser for over ten years, I saw a few different methods used to embellish applique motifs with embroidery. Sometimes a simple running stitch by hand or machine was used to secure the motif before embroidery. I didn't find that it detracted from the piece. You had to look very closely to even see it. Was it a time saver? I'm not so sure. Maybe getting that little edge turned under to nail it down by machine would take a bit of time.
Some were finished 'raw edge'. Quick and easy but embroidery thread is not terribly strong. Over time, with wear and washing, it would start to come loose leaving the applique 'unattached' and the quilt unattractive and fragile. Done for, in other words, unless someone wanted to do a lot of repair work.

For the raw edge method to work well, one would have to place those buttonhole stitches very close together as was done in the Broderie Perse examples on early cut-out chintz motifs. Even then, as you can see in this vintage example of closely spaced embroidery, there is the risk of the motif coming loose over time. This maker used a 'chain' stitch around each motif.


So I am glad I appliqued mine by hand. I did get more skilled in that method and one hundred years from now those butterflies should still be secure!

Butterflies appeared on many quilts during the Depression years. They signify hope -  much needed during that time. In spite of, or perhaps because of, the bleak circumstances of the time women made a tremendous effort to provide a cheerful home. Many quilts of the era are pastel, cheerful looking things to lift the spirits.

Here's an exceptional example from the collection of the International Quilt Study Center and Museum dated c. 1920-1940.

WOW!

I was amazed upon searching Pinterest and other sources to find a tremendous variety of styles from simple to complex; pieced, appliqued and even this one - made with a vintage handkerchief.


 Simple Applique


Simple  Pieced


Complex Pieced


 Paper- Pieced


 All Hexagons!


I have a total of 20 blocks done at this time. My records show that I started them, OMG, the summer of '97. ( I have no shame. I hope my sharing makes you feel better about some of your UFO's!)
Sometimes delays result in a chance to revise the original plan. I suppose I was aiming for a bed quilt but now I think I will work up setting that requires exactly 20 blocks and call it a day.

 It's time, don't you think?


Have you made a butterfly quilt? Do you own a vintage example?
.

Monday, August 3, 2015

Mariner's Compass - DONE!

Drum Roll, please!
 This is it! The 5th and last entry on this 'long-term' project, first shared with you in 2011. I've put links below if you want the full background before reading the finale!


You may recall that I purchased the packet of reproduction fabrics, c. 1840, in 2007. They sat in lovely stacks for a few years before being put to use!

I made a concerted effort to stick with the hand quilting over the winter and that made a big difference. I set a goal to have it done this year; to use it on my bed this fall.  Or else!

I had decided early on that I would put my name on the front of the quilt. The two outermost bottom corner 6" blocks are plain with that in mind.
Deciding how I wanted to do that took some time but I'm happy that I didn't rush it. I wanted it to be just the right thing.

I knew I wanted to repeat the circle of the central Mariner's Compass and small blue circles in the corners of the checkerboard, seen in the view above.


                       I found this design in Antique Quilting Designs by Roberta Benvin.


It was used as the center quilting motif in a feathered wreath on the plain setting blocks of a c. 1840 Double Nine Patch quilt; a circle and the required four places defined to embroider my information. 
 That fit well with the date of the reproduction fabric I used as well as the frame style layout.

Bingo!


I enlarged the design and slipped it under the corner over a light box to trace.


.
I combined embroidery with complimentary quilting.  I used double strand blue thread for the chain-stitched circle and to outline leaf shapes.

 The data itself required using a single thread.


The label on the back contains a few more details but the basics are on the front for all to see. I don't want someone have to 'discover' it by accident in 100 years....or  worse yet, NOT discover it!

At last I was ready for the  final step. Binding.

I had run out of the mottled neutral background which probably would have been my choice if I'd had enough so I'd been carrying around a piece to get a good coordinating tone. I wanted the binding to be understated letting the sharp triangle 'pennants' stand out.

I found a large print that had the right 'tone' and I thought it would work when folded 'skinny' and be interesting. I made yards and yards of it, starting sewing it on and didn't like it.


 Rip. Rip. Rip.


I didn't want to get stuck this close to the end! Luckily, a fabric that came with the original fabric line worked and I had enough of it.


The last few stitches - Had to record them!


TA -DA!


Facts:

Size:86" W x 94" L
Hours to hand quilt: 140
Batt: wool
Original Design


I hope you are all well and enjoying your quilting adventures. I have been AWOL from writing this blog for some time and hope to be much more regular now. I have acquired quite a few new 'old' quilts I'd like to share with you and have finished lots of smaller projects, too.


 Please check back and send your comments to keep me honest.


.