Tuesday, July 11, 2017

9 Patch Fun - Inspiration Evolves

The Inspiration Quilt
This picture has been on my bulletin board for a long time. I took it at a quilt show in the 1990's. The maker's name is Ruth Ann T (unreadable) from Ramsey, MN. I can't make out all the words but it is called Cabin II from a series of "cabin quilts" she was making. She was inspired by an 1800's "crib spread" in a book of antique quilts. Now, her quilt inspires me!

I like the scrappy look of alternating nine patches; some with light corners, some with dark.

Having recently finished my Kaye England top (see my January 31 post)  I needed another machine piecing project to bring to our community center sewing twice a month. I decided this was a good choice. I have a lot of unfinished projects in the queue but I got going on this and couldn't stop.

I began cutting a 2" strip off any yardage I had out for another project and making 9 patches whenever I felt like sitting at the machine with some mindless sewing. In time the box of strips and squares and some completed blocks was overflowing.

Blocks finish at 4.5"


As I sewed the 4.5" blocks together I got to thinking. Maybe I could do something more interesting.  I decided to work with the many leftover 1.5" squares from the Kaye England project as a 'center', surrounding them with the larger squares.


So the center is composed of 9 patches that finish at 3".
I wanted to surround that section with the 4.5" blocks I had been making.


I worked the math:
The 9 patches blend
for  a checkerboard appearance


Six
 3" blocks =18
Four 4.5 blocks =18

Whoopee!


I was excited by the idea. Then I took it one step further when I remembered a  collection of 6" nine patch blocks that I had acquired through an on-line swap many years ago.

But...how about the math?
Three 6" blocks =18

This was getting TOO exciting - Bonus...the blocks are already done!


My family of blocks:
Papa, Mama, and
Baby blocks

I surrounded the center with four rows of the 4.5" blocks.
I worked on the family room floor when I outgrew my design wall.


Trying out ideas for borders


I briefly considered using some plaid squares from my stash as the final border - - nope.

           Didn't like that.


Back breaking work


From the 6" blocks I chose the darker tones to create a visual border.
I liked that - two rows of those make an 80" square top.


Here is the result:

The bottom row not fully visible in this photo.

In this kind of quilt everything works. Even, maybe especially, ugly blocks and fabrics can be used. They contribute to the interest and get lost in the crowd. I tried not to overthink placement but did squint and change a few things that stood out too much.


Go ahead. Ask. 
 2,358 squares


The top on a double bed.

I realized I've had this concept in the back of my mind for years. I remembered seeing something similar in Houston in 2002...I create files to help me organize all my quilt photos and there in the Shows>Houston file was this cheerful example. No border. 

(I may not remember people's names but I never forget a quilt!)


From my collection:  Related concept using 4 patches instead 9's


You can see the 4 patch structure


I really like working with scraps. I have shelves full of yardage but I get great pleasure picking through tiny pieces, pressing them and playing. Are any of you scrap-aholics?


Amazing what fun you can have with strips of different sizes. Cut your leftover chunks into strips as you work on other projects and before you know it you'll build up a collection to play with.

If you have made quilts like this, or have vintage examples, you can send photos and I'll add them to my next post.

Happy Scrapping!

click my name under my photo in the upper right to send me an email


Saturday, June 3, 2017

Quilts for Dolly's Bed - Small Wonders Part I

Simple 9 patch c. 1930


I recently did a talk and trunk show for a local quilt guild called "Small Wonders."  I included about thirty vintage doll quilts from my collection and a dozen or so small quilts that I've made as well as a few small non-quilt textiles.

Here are a few vintage examples:


c. 1880      16" square 


A few of them are reversible.

Was it a case of trying to use up fabric bits, or possibly more practice perfecting the stitching of a young girl ?

c. 1950       22" square


This one has a special backing. It's printed patchwork; now often called "cheater" print.

c. 1900            14 x 22

The back


14 x 17


                                                                                This one was obviously made with care, perhaps by a loving mother or grandmother. 

Small scale hand-pieced stars, two borders with corner squares and hand quilted.
                                         

11 x 16


This little strippy could have been made by a little girl for her doll but we shouldn't assume that children had inferior sewing skills. In the 1800's young girls may have had better skills than older women who may have had arthritis in their hands or poor vision.

This being c. 1940,  I'd guess a youngster made it.


Polyester knit c. 1960
22 x 22


We can't ignore the poly period!                               
This little log cabin is tied, has a green plaid polyester backing and will outlive us all.                                                  


And here's a special treat!
 I just came across this poem in my files. It appeared in Good Housekeeping, July 1886.


A Jingle for the Little Ones:  

The Crazy Quilt

O summer sunset give to me 
The crimson glow you shed. 
Violet give me of your blue - 
O rose give of your red. 
O parrot give me all the green 
That round your neck is spread. 
O thistle give me of your down- 
O spider weave me thread. 
I want to make a Crazy Quilt 
For on my dolly's bed.

-- Frank H. Stauffer


Next:Part II of Small Wonders; quilts I've made - including a Crazy!

Monday, May 1, 2017

Spring Cleaning - Aprons


Decorative Dutch clogs!
My calendar flipped to May but it feels more like winter the last few days here in Minnesota. Last night it snowed up north. I got out my puffy winter coat for my walk today.

Still, I've been in the mood for some spring cleaning. It does not involve soap and water, rubber gloves or dust cloths. I must downsize my textile collection. I'm starting with a drawer full of vintage aprons collected over the years. I've washed and pressed them all and they look so nice.

 Maybe, on second thought, I can't let them go! But, no. I must do this so I'm enjoying fondling them and preparing them for new homes.


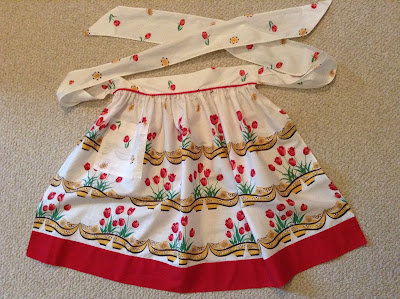
Here's a red tulips beauty. Until I was taking the close-up photo I didn't realize the stems are in Dutch clogs! It has one pocket on the left and so pristine I doubt it's ever been used. A border print put to great use.


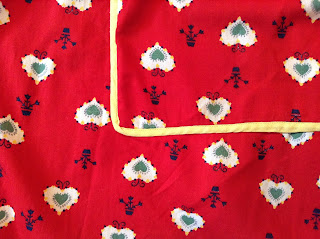
And here's a cheerful apron in a great vintage print. Yellow commercial bias tape trims the large pockets and edges adding a bit of zing.


If you'd like more information on either of these aprons or are interested in the rest of the collection please contact me via email.


And here's a set of three very sweet embroidered gingham half-aprons.  Go to Etsy for more details.

 Here's a peek:


                                           HAPPY MAY DAY!

             Click here for a May Day post on baskets and flowers quilts.


Tuesday, January 31, 2017

Scrap Top Completed

54" square
Perfect size for my dining room wall


Several years ago I went to a lecture by Kaye England , (a hilarious speaker by the way!)

I bought a pattern called Country Lanes which I came across recently during a much needed culling of 'stuff' in my sewing room.
I said to myself, "Either make it or get rid of the pattern."

You may know I like working with scraps    so .  .  .


. . . out came bags, tubs and drawers of bits and pieces; all colors and styles.


I had enough of a tan print for the major background pieces but used a mixture of neutrals in the pieced sections.

The close up to the left shows how placing three light square in corners of some sections creates the illusion of circular shapes.


1" finished squares
I prefer the less precise look of varied backgrounds plus it allows me use what I have.

I did not buy one speck of fabric for this top.

I did not 'strip piece'. 

I cut 1 1/2" squares from what I had making piles of various colors, then just sewed light to dark over and over...and over, creating 9 patches of various configurations.

Do you have scraps to 'use up'?

 Here's a link to the Pattern

Sunday, January 22, 2017

Bricks Series Returns - #8 In Progress

Does this look familiar?
If you've read my posts over the last few years you've seen this top.

Click Here to see the first post on the Bricks Project

I am taking up the Bricks Project again. I've  been on hiatus from this for too long. I had to switch gears when a few other projects took priority. . . but I'm back.


I still want the answer to the question I asked in  2011:

 "How many small quilts could I make out of this one top?"

See the first 6 small quilts here
And #7 here 

I once swore that I would never make a hexagon quilt but you know what they say, "Never say never!"

For # 8 in the series,  I've decided to experience the technique of English paper piecing - the old fashioned way; trace and cut out my own papers. I know you can order them pre-cut but part of why I do these small quilts is to learn, experience and appreciate the way things were done before we had so many 'helps' on the market.


For paper I am using the little annoying inserts that fall out of magazines...a good weight I think for cutting the hexagons and making them removable.


After tracing and cutting the first few one at a time, (duh) I decided to staple 4 papers together, draw as many hexagons as possible on the top sheet and staple the center of each one enabling me to cut out four at a time.
Generous friendDawn (Collector with a Needle), gave me the metal template for tracing, (okay, I'm not a total purist), and she gave me a quick demo on basting the fabric to the paper. She has a lot of experience with hexies.

I did two the first night and my thumb joint hurt! Yes, after just TWO! I was having second thoughts about this.


Today it went more smoothly.  I tried using a small applique pin to hold the fabric to the paper and another of those pins to hold down the starting fold. That helped keep things from slipping.


I'm using up old spools of thread to baste. I don't go through the paper so once I've joined each hex on all sides I will remove those papers and re-use them.

Here's my growing pile:


My new question: 

"Will I ever 'use up' all the fabric gleaned from that c. 1910 top?"


Sunday, January 1, 2017

Opps! 2017 Already


Is 2016 really over? I meant to post before it ended but here we are.

If you are reading this, I must thank you for not giving up on me! I refuse to claim being 'too busy'. Everyone is busy. But I did have a pretty productive year as far as quiltmaking goes.


Not having my own grand kids (yet) I have enjoyed making little quilts for other people's darlings.


I've used the Hourglass pattern for a number of quick and easy crib quilts. This one is for Beatrice.

Butterfly Flip is a great pattern by Terri Atkinson, our own Minnesota phenom, and I made two with funky brights, one for Bjorn and one for Greyson. You thought I put in the same photo twice, didn't you? Nope. The blocks are different fabrics and check out the inner borders....but I did use the same adorable owl print as outer borders.


I gained some confidence in my free motion machine quilting in the process.


The big project of the year was a wedding quilt for my son and new (as of September) Daughter-in-Law. I decided to go with something more contemporary.


I found the idea in a book called Block Party (The Modern Quilting Bee) and did it with mostly batik scraps, many of which were donated by friends who work with batiks more than I do. I used mostly 'earth-tones' and went for organic shapes such as rocks, trees, stars, leaves, water, sky, stars. I mixed in regular prints, too.


 It made a complete mess of my sewing room for a long time but it was so much fun.

I even had the two of them come over and sew some of the strips, not showing them the pattern. Dueling sewing machines facing each other - they really got into it. I had hoped they'd just make a strip each to be part of it - but they wouldn't stop, making six each.
" I thought you might just be humoring me!" I said. Heather replied, "I was at first!" Then she offered to come back and do some more.


Design wall

With the magic of long-arm quilting I was able to give it to them at Christmas time.

Full View 96" square


Pieced back


Happy Holidays
 and
 best wishes for a happy and productive 2017!