Friday, December 30, 2011

A(nother) New Year

As we start a fresh new year I am determined, as usual, to make it the most productive quilting year ever! I know that some of what I'd like to have happen won't...but I also know that some unexpected and exciting projects will fill in for those that are missing. That's the fun of it!

It all started over ten years ago with a simple list of UFO's pinned to the bulletin board over my sewing machine. This became necessary when I realized I didn't even remember some of the things I'd started with enthusiasm and abandoned before completion.

Today it has evolved into a 3-ring binder. Started in 2002 I had to move it all to a bigger one this year. It doesn't need to be fancy!

It still contains my UFO's (maybe even some of the same ones!) but I've added things like techniques I want to try, gifts to be made and ongoing projects divided into categories such as Tops Ready to Quilt, Sets of Blocks and Repair Projects. Throughout the year I cross thing off and add new ideas. It usually gets pretty messy. It's a work tool.


I'm ready for 2012!
I include pages to record monthly progress and at the end of the year I review it all and write up a summary as I get ready to start all over again with a new year.

In addition to choosing several things to prioritize, I focus on these three things each month:
  1. Doing some handwork - embroidery, quilting, hand-piecing, applique, knitting
  2. Doing something creative - no pattern, play with fabric, use scraps, try new techinques.
  3. Keeping my quilt collection updated - taking photos, measurements and other data about acquired vintage quilts and keeping notes on quilts I am making. This can really get away from me if I don't make a point of it.

Perhaps only a person trying to keep too many plates spinning in the air would need such a system but I don't think I'm alone. I showed my friend Gail my system a few years ago and she wanted to try it, too. She set up a system that works for her and we get together at the end of each month for a review. Neither of us is by any means a slave to the original plan. Sometimes it feels like we tell each other mostly what we didn't accomplish!

I can't say for sure, but I do think that setting goals and reminding myself of them on a regular basis helps me get things done. I think I am more conscious of how I choose to spend my time and what to prioritize... but if not, that's okay because I just really enjoy the process.


How do you manage your quilting life? 
Do you like to set specific goals for your quilting?
 If so, what is your system? 


Wednesday, December 28, 2011

Wrapping up the Year with 'The Babes'

Just a quick post to show you the red and white quilts made by a small group I belong to. We're called 'The Babes'; originally The Quiltin' Babes but that's another story for another time!

The red and white quilt exhibit, Infinite Variety, at the Armory in New York last March certainly made an impact across the quilt world. I think it must have been the most talked about event among quilt lovers in 2011.
Even those of us that couldn't attend were blown away by the graphic power of the quilts and the amazingly creative manner of displaying them, not to mention the story of the wonderful collection of Joanna Rose.
It inspired someone in our small group to suggest it would be fun if we each made a red and white quilt to show at at our holiday party.
The Results....
 Yes. There was a bit of  (red) wine on the premises! 

Click here for the first of three blogs about red and white quilts from my personal collection.

Coming Soon: On to 2012
Setting Quilt Goals


Thursday, December 22, 2011

Red and Green II

Holiday quilt #2 is a c. 1850  floral applique.

Red and green was a popular color scheme at that time and many 'best' quilts from that period have survived. Their graphic beauty, originality and fine workmanship make them a favorite of collectors today.

Many seem to have been made for special occasions. I wonder if the hearts in this nine-block quilt indicate that it was a bride's quilt.

82" x 92"
In the full view you will notice that the center block is a bit smaller than the rest. Also, there are only three borders; very logical to me. Why do all that work on a top border that will not be visible when on the bed?
Also, in this view you see an unfortunate problem. Sometime in the last 150 years the bottom border was damaged. I wonder what happened? Could it have been  tucked into the bottom of a bed with wooden foot-board and the wood stained it? I'd love to hear your ideas on the possibilities though I know it's hard to tell from a photo.


Here's a closer look at the damage..... sniff sniff

When I bought it I thought I might be able to 'fix' it but now I think it would be a huge task and probably not turn out very well.


Back to its allure....The little shapes that look like kites on the floral vine border are unusual, don't you think? The embroidery thread attaching it to the vine is blue now - was it once green?


The quilting includes  triple rod straight lines and diagonal crosshatching - both done right through the motif .


Even a quilt with 'problems' can be appreciated as is. I  put it on the bed with the damaged side toward the wall and no one is the wiser!


Or display it on the quilt rack....


I like to study old quilts and incorporate things I notice in my own work. Here's a wall size quilt I made a few years ago on which I quilted through the applique motifs. The inspiration for this wall piece was a bed quilt in the collection of Anita Shakelford. I'll share more about this project in a future post.
42" square


I wish you all a wonderful holiday! 
May you be warmed by the love of your friends and family...
 and by a cherished quilt!


Sunday, December 11, 2011

'Tis the Season - Red and Green I

I have two vintage red and green quilts from the mid-1800's. They will time-share the guest room bed for the holidays; each getting about a week to be on-stage. Both are old enough, and fragile enough, that they need to be removed if someone is going to use the bed.
88" x 88"


The Irish Chain done in plain white, turkey red and a green print is a simple graphic delight; one of the very earliest pieced quilt designs. 
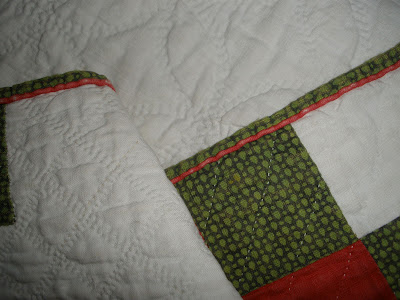
It's densely hand quilted and has red piping in the binding, a treatment most common between 1840-1880 according to Barbara Brackman in Clues in the Calico


Double line quilting in the white open areas alternates between  a double diagonal grid and double overlapping wineglasses spaced a mere 1/8" apart.
 Straight lines are quilted through the 'chain'.


 Here you can see the piping, all fabrics and all quilting motifs.
When I first laid it on the bed I noticed that there was a greenish tinge to the background fabric.  It's been used and washed in its life but probably stored for many years. The most likely explanation is that the green print had 'crocked' - not bled or run - but rubbed off, onto the creamy white. It bothered me. But this is an OLD quilt. Washing it would be a real risk. I needed to give this some serious thought.

After several years - yes really - I decided to take the risk. I was aware that I could ruin it but whatever happened it would be a learning experience and I was not happy with it the way it was.

Here is my washing method. Use at your own risk!
I use my top-loading washer leaving the lid open. With the diluted Orvus soap and water already in the machine, I gently immerse the quilt and move it up and down by hand - I do not let the machine agitate. After it sits awhile I gently push it up and down again.

The water quickly turned almost black! I drained that water, refilled the tub and repeated the process.
After rinsing in clear water one or two times I use the gentlest spin - positioning the textile at the outer edges of the tub to minimize pressure on it.  Removing the excess water is important as the stitches and fabrics are even more fragile when wet and heavy.

I then carefully remove it, blot it gently with large clean white towels and lay it flat to dry; first out on our deck but then on the grass with a clean sheet under it. I also put a clean sheet over the top and weight it down to avoid accidents with birds or other debris in the air but for the photo I took it off.

When nearly dry I put it in my dryer with NO heat - just air fluff for about 5 minutes. This causes the batting to fluff up and removes some of the wrinkles from drying flat. Perhaps some of you are fainting by now....but


Ta-Da! Success. The green tinge was gone - the quilting really stood out and the quilt was clean. If there was slight loss in some of the turkey red fabric, which was quite worn to start with, the overall look and removing the soil and the greenish tinge made that worth it to me.


I advocate careful methods and due consideration before washing any older quilt but I also believe that storing a 'dirty' quilt is not good for it.  Luckily, in this case, I had good results!

Center Stage - What a show off!

Coming Soon:  Red and Green II - An Applique

Tuesday, December 6, 2011

Changing of the Quilts

I changed the quilt on the guest room bed yesterday. I am not ready to put Christmas red and green on yet but I was ready for a change.

I don't join too many group projects but I did get in on my small group nine-patch exchange a few years ago. At each meeting we shared 3"  blocks and after a year we each had over 300 hundred of them. (We meet twice a month.) We each set them any way we liked. I chose this setting and had some nine-patches leftover.


I used a cream ground with red print shirting as background and a red with black print in a Jacob's Ladder variation.
This is the first  of only two quilts I've ever had machine quilted. I was pleased with it and loved how fast quilting goes when you do it with a checkbook!


Here's the block isolated.

Finally, we all showed off our work.  How often do twelve people start a (big) quilt project and EVERYONE finishes? A great spot for our photo, don't you think?

Friday, December 2, 2011

Two Color Graphics (and the Benefits of a Study Group)


Here are the two most recent additions to my quilt collection. I am a sucker for two color quilts. Blue and white is especially graphic but I like them all.

Hearts and Gizzards - Dutch Rose - Springtime Blossoms
Take your pick
At the end of October I was on my way home from our Minnesota study group museum field trip with a fellow quilt lover. Of course, we had to stop here and there even though both of us insist we are cutting back on collecting. There are times, however, that you just may come across something really special or very reasonable or...well, you know the rest.
I found this sweet little quilt and it fit into three categories that I'm interested in:
  1. Two Color 
  2. Crib Size (46" x 52")
  3. Machine Quilted-specifically a particular type of machine quilting seen here on the back of this quilt.


I believe it was done on something called a 'jig'; a forerunner of today's long-arm machine. I think it operated something like the John Flynn system but I need to do more research on it. I've seen the same designs on several quilts.


Here are a few more photos with this type of quilting from my collection. I don't have very good photos - hopefully if you click to enlarge you can see the design better.


 If you know more about this machine quilting I'd love to hear from you.


78" square

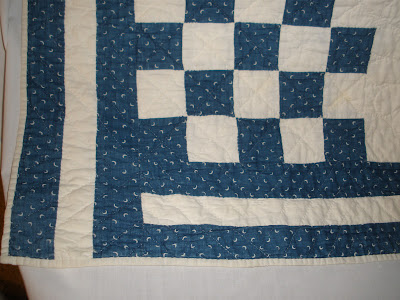
And this is the quilt I got last week. I saw an estate sale sign on the way to our study group meeting on wool quilts (in the last post). Darn. I thought - I better pass it up and get to the meeting. However, I was early! The library we meet in wasn't even open yet. So....yup! I turned around and went back to the sale. I knew my time was short so I quickly asked when I walked in,  "Any quilts?" The lady at the door thought so - in the basement. I spied this from the bottom step -  folded on a couch. I moved in hoping I didn't have to elbow anyone out of the way.....but luckily there was no competition and the price was right.


The same crescent moon indigo print is used throughout with plain white. 


It's hand quilted with a feathered wreath in the plain blocks and straight diagonal crossed lines in the checkerboard.


I really like the triple border; especially the way the corners just go off the end. 


Maybe it's a good thing that we don't have another meeting until spring.

Coming Up: December? Yikes!

Monday, November 28, 2011

Wool Quilts - Fancy and Plain

Just in time for winter here in Minnesota, our Land of Lakes Study Group met last Saturday to study wool quilts. I guess it was fitting that the day also brought our first real snowstorm. We didn't get many inches but it always takes a bit of getting used to - and it was slippery out there. One of our out-state members reported taking one hour to go seven miles and seeing eleven vehicles in the ditch!

We saw quilts from the late 1800's to the present time. Mary Chalmers started us off  by sharing several of her award winning embroidered wool quilts. Several years ago she was inspired by article in an old quilt magazine and this is the result. She took off from there as you will see in the rest of her pieces! Who can tell where inspiration will take us!

She does beautiful work. Watch for her pieces at major shows in the future.

Vibrant Fan Variation

Mary pointed out that each block is really a pieced design and only the background is 'crazy'. The black sashing helps contain the excitement.

The effort put into making a special border pays off


I was excited to share this Churn Dash, a gift from long-time friends Sharon and Horace. I had admired it years ago as it hung on a wall in their home. Thanks to their urge to downsize (and a generous heart) it came to live with me.

The 15"  blocks are made of a variety of wools, wool blends, cottons and novelty weaves.
Simple embroidered feather stitching in either white or yellow outlines each shape.
Top-stitched binding


The back is pieced of colorful 8" squares; also in a variety of fabrics including blends, cottons, silks and wools.
Though it has quite a few condition issues, the graphic appeal and the vibrancy of the colors makes it an exciting piece.

My friend Judy let me show her beautiful family quilt. She believes it was made for her Grandparents for their wedding in 1916. The log cabin variation, known as 'Pineapple', is done on a foundation in a style sometimes called 'pressed' work. The generous 20" blocks are composed of 1/2" strips. Instead of pressing the seam all the way open, the fabric is folded back just enough to cover the seam allowance. This creates a slightly three dimensional look and adds some added texture. The back is a brown cotton print c. 1890. 
Notice that the center block is slightly different than the rest - a subtle medallion setting! And check out that border.
The 20" block
The 'pressed' fold


This classic Amish Diamond in a Square quilt with Pennsylvania provenance was shared by Donna. Made of fine wool crepe, the quilting is done with black thread. Quilts like this are not common in the general public - most have been snapped up by private collectors and museums.

Detail of fine double row quilting
Click to enlarge

Visible moth damage and the printed cotton backing
Kelly shared this interesting family quilt. The maker took the time to cut diamonds for her nine patch instead of the simpler squares - that meant working with bias edges - and then she set it all on point.


Gail shared this vibrant and graphic wool quilt which was bought as a top. Her daughter finished it by tying and gave it to her Dad for Christmas. It is used regularly.


Kim Baird, from Fargo, ND, has been involved with the quilt documentation project in her state and active in many quilt related activities since the late 1970's.
She is particularly interested in the fan variation often called Wagon Wheel and shared many variations with us via Powerpoint.

Here's a lovely example from the quilt index.


This one-of-a kind fan variation is called Crazy Fans and is in the Henry Ford museum. They do look like wheels, don't they?  It was made by Susan McCord.
c. 1895
We got a big laugh out of the story Kim told about Shrek, a sheep from New Zealand  that eluded the shears for six years. Apparently the poor thing finally gave up when he could no longer see! Click here for the full story. Fifty nine pounds of wool was the yield!

HEY! Where am I? And I thought that was MY dress!


And finally, a very utilitarian example from about 1950 which I slept under many times. It was made by our Aunt Agnes. I told you about her in the post about my Second Wedding Quilt.  And that's my sister posing in front of it.
Neither of us knows what happened to the quilt but we do both remember that it was very heavy and that it kept sliding off the bed because the back was something slippery. I guess we never thought about about using it face down!

If you have thought of wool quilts as strictly utilitarian - everyday rather than fancy - some of  these examples tell a different story. As a natural fiber, wool takes dyes beautifully and gives a lustrous appearance not to mention the instant warmth such a quilt provides.
On the down side, it is prone to moth damage, a bit more challenging to clean compared to cotton and working with wool does present some unique challenges. But.....I'm inspired to add 'Wool Quilt" to my list of things to try - how about you?

Next: Just Two Colors - My Latest Additions