Showing posts with label holiday. Show all posts

Thursday, December 22, 2011

Red and Green II

Holiday quilt #2 is a c. 1850  floral applique.

Red and green was a popular color scheme at that time and many 'best' quilts from that period have survived. Their graphic beauty, originality and fine workmanship make them a favorite of collectors today.

Many seem to have been made for special occasions. I wonder if the hearts in this nine-block quilt indicate that it was a bride's quilt.

82" x 92"
In the full view you will notice that the center block is a bit smaller than the rest. Also, there are only three borders; very logical to me. Why do all that work on a top border that will not be visible when on the bed?
Also, in this view you see an unfortunate problem. Sometime in the last 150 years the bottom border was damaged. I wonder what happened? Could it have been  tucked into the bottom of a bed with wooden foot-board and the wood stained it? I'd love to hear your ideas on the possibilities though I know it's hard to tell from a photo.


Here's a closer look at the damage..... sniff sniff

When I bought it I thought I might be able to 'fix' it but now I think it would be a huge task and probably not turn out very well.


Back to its allure....The little shapes that look like kites on the floral vine border are unusual, don't you think? The embroidery thread attaching it to the vine is blue now - was it once green?


The quilting includes  triple rod straight lines and diagonal crosshatching - both done right through the motif .


Even a quilt with 'problems' can be appreciated as is. I  put it on the bed with the damaged side toward the wall and no one is the wiser!


Or display it on the quilt rack....


I like to study old quilts and incorporate things I notice in my own work. Here's a wall size quilt I made a few years ago on which I quilted through the applique motifs. The inspiration for this wall piece was a bed quilt in the collection of Anita Shakelford. I'll share more about this project in a future post.
42" square


I wish you all a wonderful holiday! 
May you be warmed by the love of your friends and family...
 and by a cherished quilt!


Sunday, December 11, 2011

'Tis the Season - Red and Green I

I have two vintage red and green quilts from the mid-1800's. They will time-share the guest room bed for the holidays; each getting about a week to be on-stage. Both are old enough, and fragile enough, that they need to be removed if someone is going to use the bed.
88" x 88"


The Irish Chain done in plain white, turkey red and a green print is a simple graphic delight; one of the very earliest pieced quilt designs. 
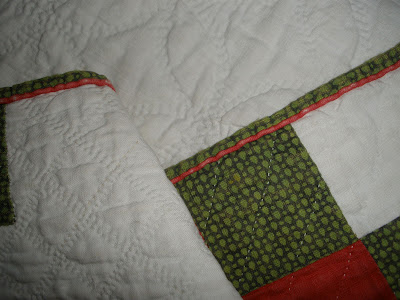
It's densely hand quilted and has red piping in the binding, a treatment most common between 1840-1880 according to Barbara Brackman in Clues in the Calico


Double line quilting in the white open areas alternates between  a double diagonal grid and double overlapping wineglasses spaced a mere 1/8" apart.
 Straight lines are quilted through the 'chain'.


 Here you can see the piping, all fabrics and all quilting motifs.
When I first laid it on the bed I noticed that there was a greenish tinge to the background fabric.  It's been used and washed in its life but probably stored for many years. The most likely explanation is that the green print had 'crocked' - not bled or run - but rubbed off, onto the creamy white. It bothered me. But this is an OLD quilt. Washing it would be a real risk. I needed to give this some serious thought.

After several years - yes really - I decided to take the risk. I was aware that I could ruin it but whatever happened it would be a learning experience and I was not happy with it the way it was.

Here is my washing method. Use at your own risk!
I use my top-loading washer leaving the lid open. With the diluted Orvus soap and water already in the machine, I gently immerse the quilt and move it up and down by hand - I do not let the machine agitate. After it sits awhile I gently push it up and down again.

The water quickly turned almost black! I drained that water, refilled the tub and repeated the process.
After rinsing in clear water one or two times I use the gentlest spin - positioning the textile at the outer edges of the tub to minimize pressure on it.  Removing the excess water is important as the stitches and fabrics are even more fragile when wet and heavy.

I then carefully remove it, blot it gently with large clean white towels and lay it flat to dry; first out on our deck but then on the grass with a clean sheet under it. I also put a clean sheet over the top and weight it down to avoid accidents with birds or other debris in the air but for the photo I took it off.

When nearly dry I put it in my dryer with NO heat - just air fluff for about 5 minutes. This causes the batting to fluff up and removes some of the wrinkles from drying flat. Perhaps some of you are fainting by now....but


Ta-Da! Success. The green tinge was gone - the quilting really stood out and the quilt was clean. If there was slight loss in some of the turkey red fabric, which was quite worn to start with, the overall look and removing the soil and the greenish tinge made that worth it to me.


I advocate careful methods and due consideration before washing any older quilt but I also believe that storing a 'dirty' quilt is not good for it.  Luckily, in this case, I had good results!

Center Stage - What a show off!

Coming Soon:  Red and Green II - An Applique